Collections Framework 총정리
Java Collections Framework란
- 지료구조 (Data Structure) 종류의 형태들을 자바 클래스로 구현한 모음집이라고 볼 수 있습니다.
- 데이터를 저장하고 자료 구조와 데이터를 처리하는 알고리즘을 구조화하여 클래스로 구현해 놓은 것입니다.
Collection Framework 장점
- 인터페이스와 다형성을 이용한 객체지향적 설계를 통해 표준화되어 있기 때문에, 사용법을 익히기에도 편리하고 재사용성이 높습니다.
- 데이터 구조 및 알고리즘의 고성능 구현을 제공하여 프로그램의 성능과 품질을 향상시킵니다.
- 관련 없는 API 간의 상호 운용성을 제공합니다. (상위 인터페이스 타입으로 업캐스팅하여 사용합니다.)
- 이미 구현되어 있는 API를 사용하면 되기에, 새로운 API를 익히고 설계하는 시간이 줄어듭니다.
- 소프트웨어 재사용을 촉진합니다. 만일 자바에서 지원하지 않는 새로운 자료구조가 필요하다면, 컬렉션을 재활용하여 종합, 새로운 알고리즘을 만들어 낼 수 있습니다.
- 컬렉션 프레임워크에 저장할 수 있는 데이터는 오로지 객체뿐입니다.
즉, int형이나 double형 같은 자바의 primitive 타입은 적재를 못한다는 말입니다.
따라서, primitive 타입을 wrapper 타입으로 변환하여 Integer 객체나 Double 객체로 박싱 (Boxing)하여 저장해야 합니다.
또한 객체를 담는 다는 것은 곧 주소값을 담는다는 것이기 때문에 null도 저장이 가능합니다.
- 컬렉션 프레임워크에 저장할 수 있는 데이터는 오로지 객체뿐입니다.
Collection Framework 종류

- Collection Framework는 크게 Collection 인터페이스와 Map 인터페이스로 나누어집니다.
- List와 Set 인터페이스를 구현한 Collection Class들은 공통 부분이 많기 때문에, 공통 부분을 모은 Collection 인터페이스로 상속 되어 있습니다.
- Map 인터페이스는 Collection들은 두 개의 데이터를 묶어 한쌍으로 다루기 때문에 Collection 인터페이스와 따로 분리되어 있습니다.
- 대부분의 Collection Class들은 List, Set, Map 중의 하나를 구현하고 있으며, 구현한 인터페이스의 이름이 클래스 이름에 포함되는 특징이 있습니다. (ArrayList, HashSet, HashMap 등등)
- 그러나 Vector, Stack, Hashtable, Properties와 같은 클래스들은 Collection Framework가 만들어지기 이전부터 존재하던 것이기 때문에 Collection Framework의 명명법을 따르지 않습니다. 또한 Vector나 Hashtable과 같은 기존의 Collection Class들은 호환을 위해 남겨진 것이므로 가급적 사용하지 않는 것이 좋습니다.
Iterator Interface

- 컬렉션 인터페이스들의 가장 최상위 인터페이스입니다.
- 컬렉션들을 배우다 보면 자료들을 순회할 때 이터레이터 객체를 다뤄보게 될텐데, 이 이터레이터 객체를 관리하는 인터페이스로 보면 됩니다.
- Iterator 인터페이스 상세
더보기
메서드 설명 default void forEach(Consumer<? super T> action) 함수형 프로그래밍 전용 루프 메서드 iterator<T> iterator() 컬렉션에서 이터레이터를 구현 default Spliterator<T> spliterator() 파이프라이닝 관련 메서드 - 참고로 Map은 iterable 인터페이스를 상속받지 않기 때문에 iterator()와 spliterator()는 Map 컬렉션에 구현이 되어 있지 않습니다. 따라서 직접적으로 Map 컬렉션을 순회할 수는 없고 스트림(Stream)을 사용하거나 간접적으로 키를 Collection으로 반환하여 루프문으로 순회하는 식을 이용합니다.
- Iterator 인터페이스 상세
Collection Interface

- List, Set, Queue에 상속을 하는 실질적인 최상위 컬렉션 타입입니다.
- 즉, 업캐스팅으로 다양한 종류의 컬렉션 자료형을 받아 자료를 삽입하거나 삭제, 탐색 기능을 할 수 있습니다. (다형성)
- Collection Interface 상세
더보기
메서드 설명 boolean add (Object o)
boolean addAll (Collection c)지정된 객체(o) 또는 Collection(c)의 객체들을 Collection에 추가 boolean contains(Object o)
boolean containsAll(Collection c)지정된 객체(o) 또는 Collection의 객체들이 Collection에 포함되어 있는지 확인 boolean remove(Object o)
boolean removeAll(Collection c)지정된 객체 또는 지정된 Collection에 포함된 객체들을 삭제 boolean retainAll(Collection c) 지정된 Collection에 포함된 객체만을 남기고 다른 객체들은 Collection에서 삭제.
사실상 removeAll의 대칭 버전.(교집합 동작)
이 작업으로 Collection에 변화가 있으면 true를 없으면 false를 반환void clear() Collection의 모든 객체를 삭제 boolean equals(Object o) 동일한 Collection인지 비교 int hashCode() Collection의 hash code를 반환 boolean isEmpty() Collection이 비어있는지 확인 Iterator iterator() Collection의 iterator를 얻어서 반환 (상위 Iterator 인터페이스를 상속) int size() Collection에 저장된 객체의 개수를 반환 Object[] toArray() Collection에 저장된 객체를 객체배열(Object[])로 반환 Object[] toArray(Object[] a) 지정된 배열에 Collection의 객체를 저장해서 반환 - JDK 1.8부터 함수형 프로그래밍을 위해 parallelStream, removeIf, stream, forEach default 메서드가 추가되었습니다.
- Collection Interface 예제
더보기
package collectionFramework; import java.util.ArrayList; import java.util.Collection; public class CollectionFramework { public static void main(String[] args) { CollectionInterface collectionInterface = new CollectionInterface(); collectionInterface.collectionExample(); } } class CollectionInterface { public void collectionExample() { Collection<Number> collection = new ArrayList<>(); for (int i = 1; i <= 5; i++) { collection.add(i); } System.out.println("CollectionInterface: " + collection); } } /** 출력 CollectionInterface: [1, 2, 3, 4, 5] */- Collection 인터페이스의 메서드를 보면 요소(객체)에 대한 추가, 삭제, 탐색은 다형성 기능으로 사용이 가능하지만, 데이터를 get하는 메서드는 보이지 않습니다. 왜냐하면 각 켈렉션 자료형마다 구현하는 자료 구조가 제각각이기 때문에 최상위 타입으로 조회하기 까다롭게 때문입니다.
- Collection Interface 상세
List Interface
1. List Interface

- 저장 순서가 유지되는 컬렉션을 구현하는데 사용합니다.
- 같은 요소의 중복 저장을 허용합니다.
- 배열과 마찬가지로 index로 요소에 접근합니다.
- 리스트와 배열의 가장 큰 차이는 리스트는 자료형 크기가 고정이 아닌 데이터 양에 따라 동적으로 변한다는 점입니다.(가변)
- 요소 사이에 빈공간을 허용하지 않아 삽입, 삭제할 때마다 배열 이동이 일어납니다.
- List Interface 상세
더보기메서드 설명 void add(int index, Object element)
boolean addAll(int index, Collection c)지정된 위치(index)에 객체(element) 또는
컬렉션에 포함된 객체들을 추가한다.Object remove(int index) 지정된 위치(index)에 있는 객체를 삭제하고 삭제된 객체를 반환한다. Object get(int index) 지정된 위치(index)에 있는 객체를 반환한다. Object set(int index, Object element) 지정된 위치(index)에 객체(element)를 저장한다. int indexOf(Object o) 지정된 객체의 위치(index)를 반환한다. (순방향) int lastIndexOf(Object o) 지정된 객체의 위치(index)를 반환한다. (역방향) List subList(int fromIndex, int toIndex) 지정된 범위(from ~ to)에 있는 객체를 반환한다. ListIterator listIterator()
ListIterator listIterator(int index)List의 객체에 접근할 수 있는 ListIterator를 반환한다. void sort(Comparator c) 지정된 비교자(comparator)로 List를 정렬한다.
- List Interface 상세
2. ArrayList Class

- 배열을 이용하여 만든 리스트입니다.
- 데이터의 저장순서가 유지되고 중복을 허용합니다.
- 데이터량에 따라 공간(Capacity)가 자동으로 변합니다.
- 단방향 포인터 구조로 자료에 대한 순차적인 접근에 강점이 있어 조회가 빠릅니다.
- 하지만 삽입, 삭제가 느리다는 단점이 존재합니다. 단, 순차적으로 추가, 삭제하는 경우에는 가장 빠릅니다.
- ArrayClass 예제
더보기
package collectionFramework;

import java.lang.reflect.Array;
import java.util.ArrayList;
import java.util.Collection;
import java.util.List;

public class CollectionFramework {

    public static void main(String[] args) {
        ArrayListClass arrayListClass = new ArrayListClass();
        arrayListClass.arrayListExample();

    }
}

class ArrayListClass {
    public void arrayListExample() {
        List<String> arrayList = new ArrayList<>();

        arrayList.add("hello");
        arrayList.add(" ArrayList");

        System.out.println("arrayListExample : " + arrayList);
        System.out.println("arrayList.get(0) : " + arrayList.get(0));
        System.out.println("arrayList.get(1) : " + arrayList.get(1));
    }
}

/**
출력
arrayListExample : [hello,  ArrayList]
arrayList.get(0) : hello
arrayList.get(1) :  ArrayList
*/
- ArrayClass 예제
3. LinkedList Class
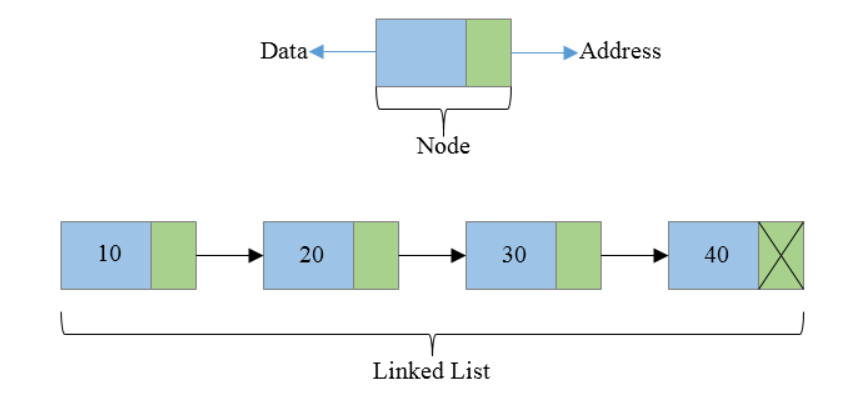
- 노드(객체)를 연결하여 리스트처럼 만든 컬렉션입니다 (배열은 아닙니다.)
- 데이터의 중간 삽입, 삭제가 빈번할 경우 빠른 성능을 보장합니다.
- 하지만 임의의 요소에 대한 접근 성능은 좋지 않습니다.
- 자바의 LinkedList는 Doubly LinkedList(양방향 포인터 구조)로 이루어져 있습니다.
- LinkedList는 리스트 용도 이외에도, 스택, 큐, 트리 등의 자료 구조의 근간이 됩니다.
- LinkedList 예제
더보기
package collectionFramework;

import com.sun.jdi.connect.spi.TransportService;
import java.lang.reflect.Array;
import java.util.ArrayList;
import java.util.Collection;
import java.util.LinkedList;
import java.util.List;

public class CollectionFramework {

    public static void main(String[] args) {
        LinkedListClass linkedListClass = new LinkedListClass();
        linkedListClass.LinkedListExample();
    }
}

class LinkedListClass {
    public void LinkedListExample() {
        List<String> linkedList = new LinkedList<>();

        linkedList.add("Hello");
        linkedList.add("LinkedList");

        System.out.println("LinkedListExample : " + linkedList);
        System.out.println("linkedList.get(0) : " + linkedList.get(0));
        System.out.println("linkedList.get(1) : " + linkedList.get(1));
    }
}

/**
출력
LinkedListExample : [Hello, LinkedList]
linkedList.get(0) : Hello
linkedList.get(1) : LinkedList
*/
- LinkedList 예제
4. Vector Class

- ArrayList의 구형 버전입니다. (내부 구성이 거의 비슷합니다.)
- ArrayList와 차이는 모든 메서드가 동기화(Synchronized)되어 있어 Thread-Safe 하다는 점입니다.
- 구버전 자바와 호환성을 위해 남겨 두었으며 잘 쓰이진 않습니다.
- 만일 현업에서 컬렉션에 동기화가 필요하다면 Collections.synchronizedList() 메서드를 이용해 ArrayList를 동기화 처리하여 사용합니다.
- Vector 예제
더보기
package collectionFramework;

import com.sun.jdi.connect.spi.TransportService;
import java.lang.reflect.Array;
import java.util.*;

public class CollectionFramework {

    public static void main(String[] args) {
        VectorClass vectorClass = new VectorClass();
        vectorClass.vectorExample();
    }
}

class VectorClass {
    public void vectorExample() {
        List<Integer> vector = new Vector<>();

        for (int i = 1; i <= 5; i++) {
            vector.add(i);
            System.out.println("vector.get(" + (i-1) + ") : " + vector.get(i-1));
        }

        System.out.println("vectorExample : " + vector);
    }
}

/**
vector.get(0) : 1
vector.get(1) : 2
vector.get(2) : 3
vector.get(3) : 4
vector.get(4) : 5
vectorExample : [1, 2, 3, 4, 5]
*/
5. Stack Class

- 후입선출 LIFO(Last In First Out) 자료구조입니다.
- 마지막에 들어온 원소가 처음으로 나갑니다.
- 들어올 때는 push, 나갈 때는 pop을 사용합니다.
- Stack은 Vector를 상속하기 때문에 문제점이 많이 잘 쓰이지 않습니다. (대신 ArrayDeque를 사용합니다.)
- Stack 예제
더보기
package collectionFramework;

import com.sun.jdi.connect.spi.TransportService;
import java.lang.reflect.Array;
import java.util.*;

public class CollectionFramework {

    public static void main(String[] args) {
        StackClass stackClass = new StackClass();
        stackClass.StackExample();
    }
}

class StackClass {
    public void StackExample() {
        Stack<Integer> stack = new Stack<>();

        for (int i = 1; i <= 5; i++) {
            stack.push(i);
        }

        System.out.println("for문으로 첫번째 원소부터 가져올 때");

        for (Integer value : stack) {
            System.out.println("stack의 " + value + "번째 원소" + value);
        }

        System.out.println("\n" + "pop으로 가져올 때 -> 마지막 값부터 조회");

        System.out.println(stack.pop());
        System.out.println(stack.pop());
        System.out.println(stack.pop());
        System.out.println(stack.pop());
        System.out.println(stack.pop());
    }
}
/**
출력
for문으로 첫번째 원소부터 가져올 때
stack의 1번째 원소1
stack의 2번째 원소2
stack의 3번째 원소3
stack의 4번째 원소4
stack의 5번째 원소5

pop으로 가져올 때 -> 마지막 값부터 조회
5
4
3
2
1
*/
- Stack 예제
Queue Interface

- 선입선출 FIFO (First In First Out) 구조입니다.
- 처음 들어온 원소가 가장 먼저 나갑니다.
- 자바에서 Queue는 인터페이스이고 필요에 따라 큐 컬렉션을 골라 사용할 수 있습니다.
- Queue Interface 상세
더보기
메서드 설명 boolean add (Object o) 지정된 객체를 Queue에 추가
저장공간 부족 시 IllegalStateException 발생Object remove() Queue에서 객체를 꺼내 반환
비어 있을 경우 NoSuchElementException 발생Object element() 삭제 없이 요소를 읽음
비어 있을 경우 NoSuchElementException 발생boolean offer(Object o) Queue에 객체를 저장 Object pall() Queue에서 객체를 꺼내서 반환
비어 있을 경우 null을 반환Object peek() 삭제 없이 요소를 읽음
비어 있을 경우 null을 반환
- Queue Interface 상세
1. PriorityQueue Class

- 우선 순위를 가지는 큐 (우선 순위 큐)
- 일반적인 큐와는 조금 다르게, 원소에 우선 순위(priority)를 부여하여 우선 순위가 높은 순으로 정렬되고 꺼냅니다.
- 수행할 작업이 여러 개 있고 시간이 제한되어 있을 때 우선순위가 높은 것부터 수행할 때 쓰입니다. (네트워크 제어, 작업 스케쥴링)
- 우선순위 큐에 저장할 객체는 필수적으로 Comparable 인터페이스를 구현해야 합니다. compareTo() 메서드 로직에 따라 자료 객체의 우선순위를 결정하는 식으로 동작되기 때문입니다.
- 저장공간으로 배열을 사용하며, 각 요소를 힙(heap) 형태로 저장합니다.
- null 저장 불가능
- 힙(heap)은 이진 트리의 한 종류로 우선순위가 가장 높은 자료를 루트 노드로 갱신한다는 점으로, 가장 큰 값이나 가장 작은 값을 빠르게 찾을 수 있다는 특징이 있습니다.
- PriorityQueue Class 예제
더보기
package collectionFramework;

import com.sun.jdi.connect.spi.TransportService;
import java.lang.reflect.Array;
import java.util.*;

public class CollectionFramework {

    public static void main(String[] args) {
        PriorityQueueClass priorityQueueClass = new PriorityQueueClass();
        priorityQueueClass.priorityQueueExample();
    }
}

class Student implements Comparable<Student> {
    String name; // 학생 이름
    int priority; // 우선순위 값

    public Student(String name, int priority) {
        this.name = name;
        this.priority = priority;
    }

    @Override
    public int compareTo(Student user) {
        // Student의 priority 필드값을 비교하여 우선순위를 결정하여 정렬
        return Integer.compare(this.priority, user.priority);
    }

    @Override
    public String toString() {
        return "Student{" +
            "name='" + name + '\'' +
            ", priority=" + priority +
            '}';
    }
}

class PriorityQueueClass {
    public void priorityQueueExample() {
        Queue<Student> priorityQueue = new PriorityQueue<>();

        priorityQueue.add(new Student("jpa", 5));
        priorityQueue.add(new Student("querydsl", 7));
        priorityQueue.add(new Student("java", 1));
        priorityQueue.add(new Student("spring", 3));

        // 우선순위 대로 정렬 (전체 조회)
        System.out.println("PriorityQueue : " + priorityQueue);

        // 우선순위가 가장 높은 값 조회
        System.out.println("우선 순위 첫 번째 : " + priorityQueue.peek());

        // for문으로 이용하여 차례대로 조회
        int index = 1;
        for (Student student : priorityQueue) {
            System.out.println("우선 순위 " + (index++) + " 번째 : " + student);
        }
    }
}

/**
PriorityQueue: [Student{name='java', priority=1}, Student{name='spring', priority=3}, Student{name='jpa', priority=5}, Student{name='querydsl', priority=7}]
우선 순위 첫 번째 Student{name='java', priority=1}
우선 순위 1 번째 : Student{name='java', priority=1}
우선 순위 2 번째 : Student{name='spring', priority=3}
우선 순위 3 번째 : Student{name='jpa', priority=5}
우선 순위 4 번째 : Student{name='querydsl', priority=7}
*/
2. Deque Interface

- Deque(Double-Ended Queue)는 양족으로 넣고 빼는 것이 가능한 큐를 말합니다.
- 스택과 큐를 하나로 합쳐놓은 것과 같으며 스택으로 사용할 수도 있고, 큐로 사용할 수도 있습니다.
- Deque의 조상은 Queue이며, 구현체로 ArrayDeque와 LinkedList 등이 있습니다.
3. ArrayDeque Class

- 스택으로 사용할 때 Stack 클래스보다 빠르며, 대기열로 사용할 때는 LinkedList보다 빠릅니다.
- 사이즈에 제한이 없습니다.
- null 요소는 저장되지 않습니다.
- ArrayDeque Class 상세
더보기
Deque Queue Stack offerLast() offer() push() pollLast() - pop() pollFirst() poll() - peekFirst() peek() - peekLast() - peek() - ArrayDeque Class 예제
더보기
package collectionFramework;

import com.sun.jdi.connect.spi.TransportService;
import java.awt.print.PrinterGraphics;
import java.lang.reflect.Array;
import java.util.*;

public class CollectionFramework {

    public static void main(String[] args) {
        ArrayDequeClass arrayDequeClass = new ArrayDequeClass();
        arrayDequeClass.ArrayDequeExample();
    }
}

class ArrayDequeClass {
    public void ArrayDequeExample() {
        Deque<Integer> arrayDeque = new ArrayDeque<>();

        arrayDeque.offerLast(30);
        System.out.println("마지막에 데이터 입력 : " + arrayDeque);
        arrayDeque.offerFirst(20);
        System.out.println("첫 번째 자리에 데이터 입력 : " + arrayDeque);
        arrayDeque.offerFirst(10);
        System.out.println("첫 번째 자리에 데이터 입력 : " + arrayDeque);
        arrayDeque.offerLast(40);
        System.out.println("마지막에 데이터 입력 : " + arrayDeque);

        arrayDeque.pollFirst();
        System.out.println("첫 번째 데이터 제외 : " + arrayDeque);
        arrayDeque.pollLast();
        System.out.println("마지막 데이터 제외 : " + arrayDeque);
        arrayDeque.pollFirst();
        System.out.println("첫 번째 데이터 제외 : " + arrayDeque);
        arrayDeque.pollLast();
        System.out.println("마지막 데이터 제외 : " + arrayDeque);
    }
}

/**
마지막에 데이터 입력 : [30]
첫 번째 자리에 데이터 입력 : [20, 30]
첫 번째 자리에 데이터 입력 : [10, 20, 30]
마지막에 데이터 입력 : [10, 20, 30, 40]
첫 번째 데이터 제외 : [20, 30, 40]
마지막 데이터 제외 : [20, 30]
첫 번째 데이터 제외 : [30]
마지막 데이터 제외 : []
*/
- ArrayDeque Class 상세
4. LinkedList Class (Queue 이용)

- LinkedList는 List 인터페이스와 Queue 인터페이스를 동시에 상속받고 있기 때문에, 스택 / 큐로서도 응용이 가능합니다.
- 실제로 LinkedList 클래스에 큐 동작과 관련된 메서드를 지원합니다. (push, pop, poll, peek, offer 등등)
- LinkedList Class (Queue 이용) 예제
더보기
package collectionFramework; import com.sun.jdi.connect.spi.TransportService; import java.awt.print.PrinterGraphics; import java.lang.reflect.Array; import java.util.*; public class CollectionFramework { public static void main(String[] args) { QueueLinkedListClass queueLinkedListClass = new QueueLinkedListClass(); queueLinkedListClass.QueueLinkedListExample(); } } class QueueLinkedListClass { public void QueueLinkedListExample() { Queue<String> queueLinkedList = new LinkedList<>(); queueLinkedList.offer("hello"); queueLinkedList.offer("java"); queueLinkedList.offer("LinkedList"); System.out.println("queueLinkedList : " + queueLinkedList); queueLinkedList.poll(); System.out.println("queueLinkedList.poll() : " + queueLinkedList); System.out.println("queueLinkedList Result : " + queueLinkedList); } } /** queueLinkedList : [hello, java, LinkedList] queueLinkedList.poll() : [java, LinkedList] queueLinkedList Result : [java, LinkedList] */- 큐(Queue)는 데이터를 꺼낼 때 항상 첫 번째 저장된 데이터를 삭제하므로, ArrayList와 같은 배열 기반의 컬렉션 클래스를 사용한다면, 데이터를 꺼낼 때마다 빈 공간을 채우기 위해 데이터의 이동 및 복사가 발생하므로 비효율적입니다. 그래서 큐는 ArrayList보다 데이터의 추가 / 삭제가 용이한 LinkedList로 구현하는 것이 적합합니다.
- LinkedList Class (Queue 이용) 예제
Set Interface

- 데이터의 중복을 허용하지 않고 순서를 유지하지 않는 데이터의 집합 리스트입니다.
- 순서 자체가 없으므로 인덱스로 객체를 검색해서 가져오는 get(index) 메서드도 존재하지 않습니다.
- 중복 저장이 불가능하기 때문에 null 값도 하나만 저장할 수 있습니다.
- Set Interface 상세
더보기
메서드 설명 boolean add(E e) 주어진 객체를 저장 후 성공적이면 true를 중복 객체면 false를 리턴합니다. boolean contains (Object o) 주어진 객체가 저장되어 있는지 여부를 리턴합니다. Iterator<E> iterator() 저장된 객체를 한 번씩 가져오는 반복자를 리턴합니다. isEmpty() 컬렉션이 비어 있는지 조사합니다. int Size() 저장되어 있는 전체 객체수를 리턴합니다. void clear() 저장된 모든 객체를 삭제합니다. boolean remove(Object o) 주어진 객체를 삭제합니다.
- Set Interface 상세
1. HashSet Class

- 배열과 연결 노드를 결합한 자료구조 형태입니다.
- 가장 빠른 임의 검색 접근 속도를 가집니다.
- 추가, 삭제, 검색, 접근성이 모두 뛰어납니다.
- 대신 순서를 전혀 예측할 수 없습니다.
- HashSet Class 예제
더보기
package collectionFramework;

import com.sun.jdi.connect.spi.TransportService;
import java.awt.print.PrinterGraphics;
import java.lang.reflect.Array;
import java.util.*;

public class CollectionFramework {

    public static void main(String[] args) {
        HashSetClass hashSetClass = new HashSetClass();
        hashSetClass.hashSetExample();
    }
}

class HashSetClass {
    public void hashSetExample() {
        Set<Integer> hashSet = new HashSet<>();

        for (int i = 10; i <= 50; i += 10) {
            hashSet.add(i);
        }
        System.out.println("HashSet 데이터 추가 : " + hashSet);

        hashSet.add(30); // 중복 요소 추가
        System.out.println("중복 요소 추가 시 : " + hashSet);

        System.out.println("hashSet.size() : " + hashSet.size()); // 중복 카운트 X

        System.out.println("hashSet Result : " + hashSet);
        // 중복 조회 X, 순서대로 조회 X
    }
}
/**
HashSet 데이터 추가 : [50, 20, 40, 10, 30]
중복 요소 추가 시 : [50, 20, 40, 10, 30]
hashSet.size() : 5
hashSet Result : [50, 20, 40, 10, 30]
*/
- HashSet Class 예제
2. LinkedHashSet Class
- 순서를 가지는 Set 자료입니다.
- 추가된 순서 또는 가장 최근에 접근한 순서대로 접근 가능합니다.
- 만일 중복을 제거하는 동시에 저장한 순서를 유지하고 싶다면, HashSet 대신 LinkedHashSet을 사용하면 됩니다.
- LinkedHashSet 예제
더보기
package collectionFramework;

import com.sun.jdi.connect.spi.TransportService;
import java.awt.print.PrinterGraphics;
import java.lang.reflect.Array;
import java.util.*;

public class CollectionFramework {

    public static void main(String[] args) {
        LinkedHashSetClass linkedHashSetClass = new LinkedHashSetClass();
        linkedHashSetClass.linkedHashSetExample();
    }
}

class LinkedHashSetClass {
    public void linkedHashSetExample() {
        Set<Integer> linkedHashSet = new LinkedHashSet<>();

        for (int i = 10; i <= 50; i += 10) {
            linkedHashSet.add(i);
        }
        System.out.println("linkedHashSet 데이터 추가 : " + linkedHashSet);

        linkedHashSet.add(30); // 중복 요소 추가
        System.out.println("중복 요소 추가 시 : " + linkedHashSet);

        System.out.println("linkedHashSet.size() : " + linkedHashSet.size());

        System.out.println("linkedHashSet Result : " + linkedHashSet);
        // 중복 조회 X, 순서대로 조회 O
    }
}
/**
linkedHashSet 데이터 추가 : [10, 20, 30, 40, 50]
중복 요소 추가 시 : [10, 20, 30, 40, 50]
linkedHashSet.size() : 5
linkedHashSet Result : [10, 20, 30, 40, 50]
*/
- LinkedHashSet 예제
3. TreeSet Class

- 이진 검색 트리 (binary search tree) 자료구조의 형태로 데이터를 저장합니다.
- 중복을 허용하지 않고, 순서를 가지지 않습니다.
- 대신 데이터를 정렬하여 저장하고 있다는 특징이 있습니다.
- 정렬, 검색, 범위 검색에 높은 성능을 갖고 있습니다.
- TreeSet Class 예제
더보기
package collectionFramework;

import com.sun.jdi.connect.spi.TransportService;
import java.awt.print.PrinterGraphics;
import java.lang.reflect.Array;
import java.util.*;

public class CollectionFramework {

    public static void main(String[] args) {
        TreeSetClass treeSetClass = new TreeSetClass();
        treeSetClass.treeSetExample();
    }
}

class TreeSetClass {
    public void treeSetExample() {
        Random random = new Random();
        Set<Integer> treeSet = new TreeSet<>();

        for (int i = 1; i <= 10; i++) {
            treeSet.add(random.nextInt(10) + 1);
        }

        System.out.println("treeSet : " + treeSet);
        // 램덤으로 값을 추가해도 순차로 정렬되어 출력되는 것을 확인할 수 있습니다.
    }
}

/**
treeSet : [2, 3, 5, 6, 7, 8, 9]
*/
- TreeSet Class 예제
4. EnumSet Class
- Enum 클래스와 함께 동작하는 Set 컬렉션입니다.
- 중복되지 않은 상수 그룹을 나타내는데 사용됩니다.
- 산술 비트 연산을 사용하여 구현되므로 HashSet보다 훨씬 빠르며, 적은 메모리를 사용합니다.
- 단, enum 타입의 요소값만 저장할 수 있고, 모든 요소들은 동일한 enum 객체에 소속되어야 합니다.
- EnumSet은 추상 클래스이고, 이를 상속한 RegularEnumSet 혹은 JumboEnumSet 객체를 사용하게 됩니다.
- EnumSet Class 예제
더보기
package collectionFramework;

import com.sun.jdi.connect.spi.TransportService;
import java.awt.print.PrinterGraphics;
import java.lang.reflect.Array;
import java.util.*;

public class CollectionFramework {

    public static void main(String[] args) {
        EnumSetClass enumSetClass = new EnumSetClass();
        enumSetClass.EnumSetExample();
    }
}

enum Color {
    RED, YELLOW, GREEN, BLUE, BLACK, WHITE
}

class EnumSetClass {
    public void EnumSetExample() {
        EnumSet<Color> enumSet = EnumSet.allOf(Color.class);

        for (Color color : enumSet) {
            System.out.println("enumSet : " + color);
        }

        System.out.println("enumSet.size() : " + enumSet.size());

        System.out.println("enumSet Result : " + enumSet);
    }
}

/**
enumSet : RED
enumSet : YELLOW
enumSet : GREEN
enumSet : BLUE
enumSet : BLACK
enumSet : WHITE
enumSet.size() : 6
enumSet Result : [RED, YELLOW, GREEN, BLUE, BLACK, WHITE]
*/
- EnumSet Class 예제
Map Interface

- 키(Key)와 값(Value)의 쌍으로 연관지어 이루어진 데이터의 집합입니다.
- 값(Value)은 중복 저장될 수 있지만, 키(Key)는 해당 Map에서 고유해야 합니다.
- 만일 기존에 저장된 데이터와 중복된 키와 값을 저장하면 기존의 값은 없어지고 마지막에 저장된 값이 남게됩니다.
- 저장 순서가 유지되지 않습니다.
- Map 상세
더보기
추상 메서드 설명 void clear() Map의 모든 객체를 삭제 boolean containsKey(Object key) 지정된 key 객체와 일치하는 객체가 있는지 확인 boolean containsValue(Object value) 지정된 value 객체와 일치하는 객체가 있는지 확인 Set entrySet() Map에 저장된 key-value 쌍을 Map, Entry 타입의 객체로 저장한 Set을 반환 boolean equals(Object o) 동일한 Map인지 비교 Object get(Object key) 지정한 key 객체에 대응하는 value 객체를 반환 int hashCode() 해시코드를 반환 boolean isEmpty() Map이 비어있는지 확인 Set keySet() Map에 지정된 모드 key 객체를 반환 Object put(Object key, Object value) Map에 key 객체와 value 객체를 연결(mapping)하여 저장 void putAll(Map t) 지정된 Map의 모든 key-value 쌍을 추가 Object remove(Object key) 지정한 key 객체와 일치하는 key-value 객체를 삭제 int size() Map에 저장된 key-value 쌍의 개수를 반환 Collection values() Map에 저장된 모든 value 객체를 반환 - Map 인터페이스의 메서드를 보면, key 값을 반환할 때 Set 인터페이스 타입으로 반환하고, Value 값을 반환할 때 Collection 타입으로 반환하는걸 확인할 수 있습니다.
Map 인터페이스에서 값(value)은 중복을 허용하기 때문에 Collection 타입으로 반환하고, 키(key)는 중복을 허용하지 않기 때문에 Set 타입으로 반환하는 것입니다.
- Map 상세
1. Map.Entry Interface
- Map.Entry 인터페이스는 Map 인터페이스 안에 있는 내부 인터페이스입니다.
- Map에 저장되는 key-value 쌍의 Node 내부 클래스가 이를 구현하고 있습니다.
- Map 자료구조를 보다 객체지향적인 설계를 하도록 유도하기 위한 것입니다.
- Map.Entry 상세
더보기
메서드 설명 boolean equals(Object o) 동일한 Entry인지 비교 Object getKey() Entry의 key 객체를 반환 Object getValue() Entry의 value 객체를 반환 int hashCode() Entry의 해시코드 반환 Object setValue(Object o) Entry의 value 객체를 지정된 객체로 교체 - Map.Entry 예제
더보기
package collectionFramework;

import com.sun.jdi.connect.spi.TransportService;
import java.awt.print.PrinterGraphics;
import java.lang.reflect.Array;
import java.util.*;

public class CollectionFramework {

    public static void main(String[] args) {
        MapEntryInterface mapEntryInterface = new MapEntryInterface();
        mapEntryInterface.MapEntryExample();
    }
}

class MapEntryInterface {
    public void MapEntryExample() {
        Map<String, Integer> mapEntry = new HashMap<>();

        mapEntry.put("a", 1);
        mapEntry.put("b", 2);
        mapEntry.put("c", 3);

        // Map.Entry 인터페이스를 구현하고 있는
        // Key-Value 쌍을 가지고 있는 HashMap의 Node 객체들의 Set 집합을 반환
        Set<Map.Entry<String, Integer>> entry = mapEntry.entrySet();

        System.out.println(entry);

        // Set을 순회하면서 Map.Entry를 구현한 Node 객체에서 key와 value를 얻어 출력
        for (Map.Entry<String, Integer> e : entry) {
            System.out.printf("%s : %d \n", e.getKey(), e.getValue());
        }
    }
}
/**
[a=1, b=2, c=3]
a : 1
b : 2
c : 3
*/
- Map.Entry 상세
2. HashMap Class

- Hashtable을 보완한 컬렉션입니다.
- 배열과 연결이 결합된 Hashing 형태로, 키(key)와 값(value)을 묶어 하나의 데이터로 저장합니다.
- 중복을 허용하지 않고 순서를 보장하지 않습니다.
- 키와 값으로 null이 허용됩니다.
- 추가, 삭제, 검색, 접근성이 모두 뛰어납니다.
- HashMap은 비동기로 동작하기 때문에 멀티 스레드 환경에서는 어울리지 않습니다. (대신 ConcurrentHashMap 사용)
- HashMap Class 예제
더보기
package collectionFramework;

import com.sun.jdi.connect.spi.TransportService;
import java.awt.print.PrinterGraphics;
import java.lang.reflect.Array;
import java.util.*;

public class CollectionFramework {

    public static void main(String[] args) {
        HashMapClass hashMapClass = new HashMapClass();
        hashMapClass.hashMapExample();
    }
}

class HashMapClass {
    public void hashMapExample() {
        Map<String, String> hashMap = new HashMap<>();

        hashMap.put("java", "자바");
        hashMap.put("Spring", "스프링");
        hashMap.put("Spring Boot", "스프링 부트");

        System.out.println("hashMap.get() : " + hashMap.get("Spring"));

        for (String key : hashMap.keySet()) {
            System.out.println(key + " : " + hashMap.get(key));
        }

        System.out.println("HashMap Result : " + hashMap);
    }
}
/**
hashMap.get() : 스프링
java : 자바
Spring Boot : 스프링 부트
Spring : 스프링
HashMap Result : {java=자바, Spring Boot=스프링 부트, Spring=스프링}
*/
- HashMap Class 예제
3. LinkedHashMap Class

- HashMap을 상속하기 때문에 흡사하지만, Entry들이 연결 리스트를 구성하여 데이터의 순서를 보장합니다.
- 일반적으로 Map 자료구조는 순서를 가지지 않지만, LinkedHashMap은 들어온 순서대로 순서를 가집니다.
- LinkedHashMap 예제
더보기
package collectionFramework;

import com.sun.jdi.connect.spi.TransportService;
import java.awt.print.PrinterGraphics;
import java.lang.reflect.Array;
import java.util.*;

public class CollectionFramework {

    public static void main(String[] args) {
        LinkedHashMapClass linkedHashMapClass = new LinkedHashMapClass();
        linkedHashMapClass.linkedHashMapExample();
    }
}

class LinkedHashMapClass {
    public void linkedHashMapExample() {
        System.out.println("HashMap과 LinkedHashMap 비교");
        System.out.println("-------------HashMap-------------");

        Map<Integer, String> hashMap = new HashMap<>();

        hashMap.put(10, "하나");
        hashMap.put(20, "둘");
        hashMap.put(30, "셋");

        for (Integer key : hashMap.keySet()) {
            System.out.println(key + " : " + hashMap.get(key));
            // 정렬 X
        }

        System.out.println("-------------LinkedHashMap-------------");

        Map<Integer, String> linkedHashMap = new LinkedHashMap<>();

        linkedHashMap.put(10, "하나");
        linkedHashMap.put(20, "둘");
        linkedHashMap.put(30, "셋");

        for (Integer key : linkedHashMap.keySet()) {
            System.out.println(key + " : " + linkedHashMap.get(key));
            // 정렬 O
        }
    }
}
/**
HashMap과 LinkedHashMap 비교
-------------HashMap-------------
20 : 둘
10 : 하나
30 : 셋
-------------LinkedHashMap-------------
10 : 하나
20 : 둘
30 : 셋
*/
- LinkedHashMap 예제
4. TreeMap Class

- 이진 검색 트리의 형태로 키와 값의 쌍으로 이루어진 데이터를 저장합니다. (TreeSet과 같은 원리)
- TreeMap은 SortedMap 인터페이스를 구현하고 있어 Key 값을 기준으로 정렬되는 특징을 가지고 있습니다.
- 정렬된 순서로 키 / 값 쌍을 저장하므로 빠른 검색(특히 범위 검색)이 가능합니다.
- 단, 키와 값을 저장하는 동시에 정렬을 행하기 때문에 저장시간이 다소 오래 걸립니다.
- 정렬되는 순서는 숫자 -> 알파벳 대문자 -> 알파벳 소문자 -> 한글 순입니다.
- TreeMap Class 예제
더보기
package collectionFramework;

import com.sun.jdi.connect.spi.TransportService;
import java.awt.print.PrinterGraphics;
import java.lang.reflect.Array;
import java.util.*;

public class CollectionFramework {

    public static void main(String[] args) {
        TreeMapClass treeMapClass = new TreeMapClass();
        treeMapClass.treeMapExample();
    }
}

class TreeMapClass {
    public void treeMapExample() {
        Map<Integer, String> treeMap = new TreeMap<>();

        treeMap.put(1, "원");
        treeMap.put(2, "투");
        treeMap.put(3, "쓰리");

        for (Integer key : treeMap.keySet()) {
            System.out.println(key + " : " + treeMap.get(key));
        }
    }
}
/**
1 : 원
2 : 투
3 : 쓰리
*/
- TreeMap Class 예제
5. HashTable Class

- 자바 초기 버전에 나온 레거시 클래스입니다.
- Key를 특정 해시 함수를 통해 해싱한 후 나온 결과를 배열의 인덱스로 사용하여 Value를 찾는 방식으로 동작됩니다.
- HashMap 보다는 느리지만 동기화가 기본 지원됩니다.
- 키와 값으로 null이 허용되지 않습니다.
- HashTable Class 예제
더보기
package collectionFramework;

import com.sun.jdi.connect.spi.TransportService;
import java.awt.print.PrinterGraphics;
import java.lang.reflect.Array;
import java.util.*;

public class CollectionFramework {

    public static void main(String[] args) {
        HashTableClass hashTableClass = new HashTableClass();
        hashTableClass.HashTableExample();
    }
}

class HashTableClass {
    public void HashTableExample() {
        Map<String, String> hashTable = new HashMap<>();

        hashTable.put("JPA", "jpa");
        hashTable.put("QUERYDSL", "querydsl");
        hashTable.put("JPQL", "jpql");

        for (String key : hashTable.keySet()) {
            System.out.println(key + " : " + hashTable.get(key));
        }
    }
}
/**
JPQL : jpql
QUERYDSL : querydsl
JPA : jpa
*/
- HashTable Class 예제
6. Properties Class
- Properties(String, String)의 형태로 저장하는 단순화된 key-value 컬렉션입니다.
- 주로 애플리케이션의 환경 설정과 관련된 속성 파일인 .properties를 설정하는데 사용됩니다.
- Properties Class 예제
더보기
package collectionFramework;

import com.sun.jdi.connect.spi.TransportService;
import java.awt.print.PrinterGraphics;
import java.io.IOException;
import java.io.InvalidObjectException;
import java.io.OutputStreamWriter;
import java.io.Writer;
import java.lang.reflect.Array;
import java.nio.charset.StandardCharsets;
import java.nio.file.Files;
import java.nio.file.Path;
import java.nio.file.Paths;
import java.util.*;

public class CollectionFramework {

    public static void main(String[] args) {
        PropertiesClass propertiesClass = new PropertiesClass();
        propertiesClass.propertiesExample();
    }
}

class PropertiesClass {
    public void propertiesExample() {
        Properties properties = new Properties();

        // Properties 컬렉션에 String : String 구조의 데이터 추가
        properties.setProperty("Backend", "백엔드");
        properties.setProperty("Frontend", "프론트엔드");
        properties.setProperty("FullStack", "풀스택");

        // programming.properties 파일에 Properties 자료들을 저장
        // properties 파일은 지정된 경로에 저장됩니다.
        Path propertiesFile = Paths.get("src/main/resources/programming.properties");

        try (Writer writer =
            new OutputStreamWriter(Files.newOutputStream(propertiesFile), StandardCharsets.UTF_8)) {
            properties.store(writer, "Properties File Test");
        } catch (IOException e) {
            e.printStackTrace();
        }
    }
}
/**
resources 파일에서 결과를 확인하면
properties 파일에
#Properties File Test
#Mon May 20 03:19:25 KST 2024
Backend=백엔드
Frontend=프론트엔드
FullStack=풀스택
이 내용이 담겨 있습니다.
*/
- Properties Class 예제
예제 전체
더보기
package collectionFramework;

import java.io.IOException;
import java.io.OutputStreamWriter;
import java.io.Writer;
import java.nio.charset.StandardCharsets;
import java.nio.file.Files;
import java.nio.file.Path;
import java.nio.file.Paths;
import java.util.*;

public class CollectionFramework {

    public static void main(String[] args) {
        System.out.println("-----------------Collection 인터페이스 예제-----------------");
        CollectionInterface collectionInterface = new CollectionInterface();
        collectionInterface.collectionExample();

        System.out.println("\n-----------------ArrayList 클래스 예제-----------------");
        ArrayListClass arrayListClass = new ArrayListClass();
        arrayListClass.arrayListExample();

        System.out.println("\n-----------------LinkedList 클래스 예제-----------------");
        LinkedListClass linkedListClass = new LinkedListClass();
        linkedListClass.linkedListExample();

        System.out.println("\n-----------------Vector 클래스 예제-----------------");
        VectorClass vectorClass = new VectorClass();
        vectorClass.vectorExample();

        System.out.println("\n-----------------Stack 클래스 예제-----------------");
        StackClass stackClass = new StackClass();
        stackClass.stackExample();

        System.out.println("\n-----------------PriorityQueue 클래스 예제-----------------");
        PriorityQueueClass priorityQueueClass = new PriorityQueueClass();
        priorityQueueClass.priorityQueueExample();

        System.out.println("\n-----------------ArrayDequeClass 클래스 예제-----------------");
        ArrayDequeClass arrayDequeClass = new ArrayDequeClass();
        arrayDequeClass.arrayDequeExample();

        System.out.println("\n-----------------QueueLinkedList 클래스 예제-----------------");
        QueueLinkedListClass queueLinkedListClass = new QueueLinkedListClass();
        queueLinkedListClass.queueLinkedListExample();

        System.out.println("\n-----------------hashSet 클래스 예제-----------------");
        HashSetClass hashSetClass = new HashSetClass();
        hashSetClass.hashSetExample();

        System.out.println("\n-----------------LinkedHashSetClass 클래스 예제-----------------");
        LinkedHashSetClass linkedHashSetClass = new LinkedHashSetClass();
        linkedHashSetClass.linkedHashSetExample();

        System.out.println("\n-----------------TreeSetClass 클래스 예제-----------------");
        TreeSetClass treeSetClass = new TreeSetClass();
        treeSetClass.treeSetExample();

        System.out.println("\n-----------------EnumSet 클래스 예제-----------------");
        EnumSetClass enumSetClass = new EnumSetClass();
        enumSetClass.EnumSetExample();

        System.out.println("\n-----------------MapEntry 인터페이스 예제-----------------");
        MapEntryInterface mapEntryInterface = new MapEntryInterface();
        mapEntryInterface.mapEntryExample();

        System.out.println("\n-----------------HashMap 클래스 예제-----------------");
        HashMapClass hashMapClass = new HashMapClass();
        hashMapClass.hashMapExample();

        System.out.println("\n-----------------LinkedHashMap 클래스 예제-----------------");
        LinkedHashMapClass linkedHashMapClass = new LinkedHashMapClass();
        linkedHashMapClass.linkedHashMapExample();

        System.out.println("\n-----------------TreeMap 클래스 예제-----------------");
        TreeMapClass treeMapClass = new TreeMapClass();
        treeMapClass.treeMapExample();

        System.out.println("\n-----------------HashTable 클래스 예제-----------------");
        HashTableClass hashTableClass = new HashTableClass();
        hashTableClass.HashTableExample();

        System.out.println("\n-----------------Properties 클래스 예제-----------------");
        PropertiesClass propertiesClass = new PropertiesClass();
        propertiesClass.propertiesExample();
    }
}

class PropertiesClass {
    public void propertiesExample() {
        Properties properties = new Properties();

        // Properties 컬렉션에 String : String 구조의 데이터 추가
        properties.setProperty("Backend", "백엔드");
        properties.setProperty("Frontend", "프론트엔드");
        properties.setProperty("FullStack", "풀스택");

        // programming.properties 파일에 Properties 자료들을 저장
        Path propertiesFile = Paths.get("src/main/resources/programming.properties");


        try (Writer writer =
            new OutputStreamWriter(Files.newOutputStream(propertiesFile), StandardCharsets.UTF_8)) {
            properties.store(writer, "Properties File Test");
        } catch (IOException e) {
            e.printStackTrace();
        }
    }
}

class HashTableClass {
    public void HashTableExample() {
        Map<String, String> hashTable = new HashMap<>();

        hashTable.put("JPA", "jpa");
        hashTable.put("QUERYDSL", "querydsl");
        hashTable.put("JPQL", "jpql");

        for (String key : hashTable.keySet()) {
            System.out.println(key + " : " + hashTable.get(key));
        }
    }
}

class TreeMapClass {
    public void treeMapExample() {
        Map<Integer, String> treeMap = new TreeMap<>();

        treeMap.put(1, "원");
        treeMap.put(2, "투");
        treeMap.put(3, "쓰리");

        for (Integer key : treeMap.keySet()) {
            System.out.println(key + " : " + treeMap.get(key));
        }
    }
}

class LinkedHashMapClass {
    public void linkedHashMapExample() {
        System.out.println("HashMap과 LinkedHashMap 비교");
        System.out.println("-------------HashMap-------------");

        Map<Integer, String> hashMap = new HashMap<>();

        hashMap.put(10, "하나");
        hashMap.put(20, "둘");
        hashMap.put(30, "셋");

        for (Integer key : hashMap.keySet()) {
            System.out.println(key + " : " + hashMap.get(key));
            // 정렬 X
        }

        System.out.println("-------------LinkedHashMap-------------");

        Map<Integer, String> linkedHashMap = new LinkedHashMap<>();

        linkedHashMap.put(10, "하나");
        linkedHashMap.put(20, "둘");
        linkedHashMap.put(30, "셋");

        for (Integer key : linkedHashMap.keySet()) {
            System.out.println(key + " : " + linkedHashMap.get(key));
            // 정렬 O
        }
    }
}

class HashMapClass {
    public void hashMapExample() {
        Map<String, String> hashMap = new HashMap<>();

        hashMap.put("java", "자바");
        hashMap.put("Spring", "스프링");
        hashMap.put("Spring Boot", "스프링 부트");

        System.out.println("hashMap.get() : " + hashMap.get("Spring"));

        for (String key : hashMap.keySet()) {
            System.out.println(key + " : " + hashMap.get(key));
        }

        System.out.println("HashMap Result : " + hashMap);
    }
}

class MapEntryInterface {
    public void mapEntryExample() {
        Map<String, Integer> mapEntry = new HashMap<>();

        mapEntry.put("a", 1);
        mapEntry.put("b", 2);
        mapEntry.put("c", 3);

        // Map.Entry 인터페이스를 구현하고 있는
        // Key-Value 쌍을 가지고 있는 HashMap의 Node 객체들의 Set 집합을 반환
        Set<Map.Entry<String, Integer>> entry = mapEntry.entrySet();

        System.out.println(entry);

        // Set을 순회하면서 Map.Entry를 구현한 Node 객체에서 key와 value를 얻어 출력
        for (Map.Entry<String, Integer> e : entry) {
            System.out.printf("%s : %d \n", e.getKey(), e.getValue());
        }
    }
}

enum Color {
    RED, YELLOW, GREEN, BLUE, BLACK, WHITE
}

class EnumSetClass {
    public void EnumSetExample() {
        EnumSet<Color> enumSet = EnumSet.allOf(Color.class);

        for (Color color : enumSet) {
            System.out.println("enumSet : " + color);
        }

        System.out.println("enumSet.size() : " + enumSet.size());

        System.out.println("enumSet Result : " + enumSet);
    }
}

class TreeSetClass {
    public void treeSetExample() {
        Random random = new Random();
        Set<Integer> treeSet = new TreeSet<>();

        for (int i = 1; i <= 10; i++) {
            treeSet.add(random.nextInt(10) + 1);
        }

        System.out.println("treeSet : " + treeSet);
        // 램덤으로 값을 추가해도 순차로 정렬되어 출력되는 것을 확인할 수 있습니다.
    }
}

class LinkedHashSetClass {
    public void linkedHashSetExample() {
        Set<Integer> linkedHashSet = new LinkedHashSet<>();

        for (int i = 10; i <= 50; i += 10) {
            linkedHashSet.add(i);
        }
        System.out.println("linkedHashSet 데이터 추가 : " + linkedHashSet);

        linkedHashSet.add(30); // 중복 요소 추가
        System.out.println("중복 요소 추가 시 : " + linkedHashSet);

        System.out.println("linkedHashSet.size() : " + linkedHashSet.size());

        System.out.println("linkedHashSet Result : " + linkedHashSet);
    }
}

class HashSetClass {
    public void hashSetExample() {
        Set<Integer> hashSet = new HashSet<>();

        for (int i = 10; i <= 50; i += 10) {
            hashSet.add(i);
        }
        System.out.println("HashSet 데이터 추가 : " + hashSet);

        hashSet.add(30); // 중복 요소 추가
        System.out.println("중복 요소 추가 시 : " + hashSet);

        System.out.println("hashSet.size() : " + hashSet.size()); // 중복 카운트 X

        System.out.println("hashSet Result : " + hashSet);
    }
}

class QueueLinkedListClass {
    public void queueLinkedListExample() {
        Queue<String> queueLinkedList = new LinkedList<>();

        queueLinkedList.offer("hello");
        queueLinkedList.offer("java");
        queueLinkedList.offer("LinkedList");
        System.out.println("queueLinkedList : " + queueLinkedList);

        queueLinkedList.poll();
        System.out.println("queueLinkedList.poll() : " + queueLinkedList);

        System.out.println("queueLinkedList Result : " + queueLinkedList);
    }
}

class ArrayDequeClass {
    public void arrayDequeExample() {
        Deque<Integer> arrayDeque = new ArrayDeque<>();

        arrayDeque.offerLast(30);
        System.out.println("마지막에 데이터 입력 : " + arrayDeque);
        arrayDeque.offerFirst(20);
        System.out.println("첫 번째 자리에 데이터 입력 : " + arrayDeque);
        arrayDeque.offerFirst(10);
        System.out.println("첫 번째 자리에 데이터 입력 : " + arrayDeque);
        arrayDeque.offerLast(40);
        System.out.println("마지막에 데이터 입력 : " + arrayDeque);

        arrayDeque.pollFirst();
        System.out.println("첫 번째 데이터 제외 : " + arrayDeque);
        arrayDeque.pollLast();
        System.out.println("마지막 데이터 제외 : " + arrayDeque);
        arrayDeque.pollFirst();
        System.out.println("첫 번째 데이터 제외 : " + arrayDeque);
        arrayDeque.pollLast();
        System.out.println("마지막 데이터 제외 : " + arrayDeque);
    }
}

class Student implements Comparable<Student> {
    String name; // 학생 이름
    int priority; // 우선순위 값

    public Student(String name, int priority) {
        this.name = name;
        this.priority = priority;
    }

    @Override
    public int compareTo(Student user) {
        // Student의 priority 필드값을 비교하여 우선순위를 결정하여 정렬
        return Integer.compare(this.priority, user.priority);
    }

    @Override
    public String toString() {
        return "Student{" +
            "name='" + name + '\'' +
            ", priority=" + priority +
            '}';
    }
}

class PriorityQueueClass {
    public void priorityQueueExample() {
        Queue<Student> priorityQueue = new PriorityQueue<>();

        priorityQueue.add(new Student("jpa", 5));
        priorityQueue.add(new Student("querydsl", 7));
        priorityQueue.add(new Student("java", 1));
        priorityQueue.add(new Student("spring", 3));

        // 우선순위 대로 정렬되어 있음
        System.out.println("PriorityQueue : " + priorityQueue);

        // 우선순위가 가장 높은 값을 참조
        System.out.println("우선 순위 첫 번째 : " + priorityQueue.peek());

        // 차례대로 꺼내기
        int index = 1;
        for (Student student : priorityQueue) {
            System.out.println("우선 순위 " + (index++) + " 번째 : " + student);
        }
    }
}

class StackClass {
    public void stackExample() {
        Stack<Integer> stack = new Stack<>();

        for (int i = 1; i <= 5; i++) {
            stack.push(i);
        }

        System.out.println("for문으로 첫번째 원소부터 가져올 때");

        for (Integer value : stack) {
            System.out.println("stack의 " + value + "번째 원소" + value);
        }

        System.out.println("\n" + "pop으로 가져올 때 -> 마지막 값부터 조회");

        System.out.println(stack.pop());
        System.out.println(stack.pop());
        System.out.println(stack.pop());
        System.out.println(stack.pop());
        System.out.println(stack.pop());
    }
}

class VectorClass {
    public void vectorExample() {
        List<Integer> vector = new Vector<>();

        for (int i = 1; i <= 5; i++) {
            vector.add(i);
            System.out.println("vector.get(" + (i-1) + ") : " + vector.get(i-1));
        }

        System.out.println("vectorExample : " + vector);
    }
}

class LinkedListClass {
    public void linkedListExample() {
        List<String> linkedList = new LinkedList<>();

        linkedList.add("Hello");
        linkedList.add("LinkedList");

        System.out.println("LinkedListExample : " + linkedList);
        System.out.println("linkedList.get(0) : " + linkedList.get(0));
        System.out.println("linkedList.get(1) : " + linkedList.get(1));
    }
}

class ArrayListClass {
    public void arrayListExample() {
        List<String> arrayList = new ArrayList<>();

        arrayList.add("hello");
        arrayList.add(" ArrayList");

        System.out.println("arrayListExample : " + arrayList);
        System.out.println("arrayList.get(0) : " + arrayList.get(0));
        System.out.println("arrayList.get(1) : " + arrayList.get(1));
    }
}

class CollectionInterface {
    public void collectionExample() {
        Collection<Number> collection = new ArrayList<>();
        for (int i = 1; i <= 5; i++) {
            collection.add(i);
        }
        System.out.println("CollectionInterface: " + collection);
    }
}
컬렉션 프레임워크 선택 시점

ArrayList
- 리스트 자료 구조를 사용한다면 기본 선택입니다.
- 임의의 요소에 대한 접근성이 뛰어납니다.
- 순차적인 추가 / 삭제가 가장 빠릅니다.
- 요소의 추가 / 삭제가 불리합니다.
LinkedList
- 요소의 추가 / 삭제에 유리합니다.
- 임의의 요소에 대한 접근성이 좋지 않습니다.
HashMap / HashSet
- 해싱을 이용해 임의의 요소에 대한 추가 / 삭제 / 검색 / 접근성 모두 뛰어납니다.
- 검색에 최고 성능을 갖고 있습니다.
TreeMap / TreeSet
- 요소 정렬이 필요할 때 사용합니다.
- 검색 (특히 범위 검색)에 적합합니다.
- 그래도 검색 성능은 HashMap보다 떨어집니다.
LinkedHashMap / LinkedHashSet
- HashMap과 HashSet에 저장 순서 유지 기능을 추가하면 됩니다.
Queue
- 스택 (LIFO) / 큐 (FIFO) 자료구조가 필요하면 ArrayDeque를 사용하면 됩니다.
Stack, HashTable
- 가급적 사용하지 않습니다. (deprecated)
'JAVA' 카테고리의 다른 글
| [JAVA] - LocalDate, LocalDateTime 날짜 더하기 빼기 (0) | 2024.05.24 |
|---|---|
| [JAVA] - 객체 지향 설계 5원칙 - S.O.L.I.D & 특징 4가지 (추상화, 상속, 다형성, 캡슐화) (1) | 2024.03.13 |
| [JAVA] - 최대공약수, 최소공배수 구하는 방법 (0) | 2024.02.19 |
| [JAVA] - 진법 변환 정리 (0) | 2024.02.18 |
| [JAVA] - Object (equals, toString) 클래스 (0) | 2024.02.14 |
